Wednesday, September 14, 2016

SMS OTP Two Factor Authentication through Identity Server

In this post, I will explain how to use SMS OTP multifactor authenticator through WSO2 Identity server. In this demonstration, I am using Twilio SMS Provider which was used to send the OTP code via SMS at the time authentication happens.


SMS OTP Authentication Flow


The SMS OTP authenticator of WSO2 Identity Server allows to authenticate the system using multifactor authentication. This authenticator authenticates with user name and password as a first step, then sending the one time password to the mobile via SMS as a second step. WSO2 IS will validate the code and let the user sign in accordingly


Add the authenticator configuration <IS_HOME>/repository/conf/identity/application-authentication.xml file under the <AuthenticatorConfigs> section.


<AuthenticatorConfig name="SMSOTP" enabled="true">
    <Parameter name="SMSOTPAuthenticationEndpointURL">https://localhost:9443/smsotpauthenticationendpoint/smsotp.jsp</Parameter>
    <Parameter name="SMSOTPAuthenticationEndpointErrorPage">https://localhost:9443/smsotpauthenticationendpoint/smsotpError.jsp</Parameter>
    <Parameter name="MobileNumberRegPage">https://localhost:9443/smsotpauthenticationendpoint/mobile.jsp</Parameter>
    <Parameter name="RetryEnable">true</Parameter>
    <Parameter name="ResendEnable">true</Parameter>
    <Parameter name="BackupCode">true</Parameter>
    <Parameter name="SMSOTPEnableByUserClaim">false</Parameter>
    <Parameter name="SMSOTPMandatory">false</Parameter>
    <Parameter name="usecase">association</Parameter>
    <Parameter name="secondaryUserstore">primary</Parameter>
    <Parameter name="CaptureAndUpdateMobileNumber">true</Parameter>
    <Parameter name="SendOTPDirectlyToMobile">false</Parameter>
</AuthenticatorConfig>

Configure the Service Provider and Identity Provider Configuration as we normally configure for Two factor authentication. Now we will configure SMS OTP Identity provider for Twilio specific SMS Provider.


Go to ​ https://www.twilio.com/try­twilio​  and create a twilio account.

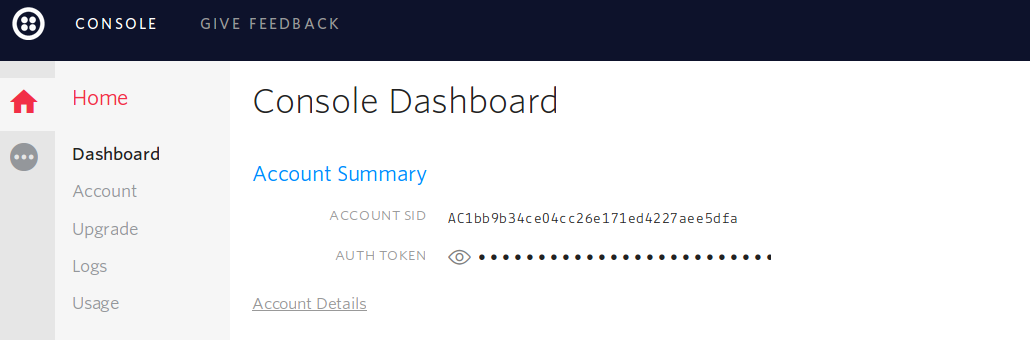
While registering the account, verify your mobile number and click on console home

https://www.twilio.com/console​  to get free credits (Account SID and Auth Token).


Twilio uses a POST method with headers and the text message and phone number are sent asthe payload. So the fields would be as follows.

SMS URL             https://api.twilio.com/2010­04­01/Accounts/{AccountSID}/SMS/Messages.json
HTTP Method     POST
HTTP Headers    Authorization: Basic base64{AccountSID:AuthToken}
HTTP Payload    Body=$ctx.msg&To=$ctx.num&From={FROM_NUM}

You can go to SMS OTP Identity Provider and configure to send the SMS using Twilio SMS Provider.

Twilio SMS Provider Config


When authentication is happening in second step, the code will be sent to mobile no which is saved in mobile claim of  user's user profile.
If the user apply the code, WSO2 IS will validate the code and let the user sign in accordingly.

Monday, April 4, 2016

WSO2 ESB Kafka Inbound and Kafka Connector Performance tuning

In this post, I am going to explain about Kafka connector and Kafka inbound endpoint performance with WSO2 ESB 4.9 and how to tune the performance for producer and consumer use cases. The performance test of Kafka inbound endpoint and Kafka connector was carried out on below machine configuration:

Performance Test Environment :

OS: Ubuntu 64-bit
Memory: 16GiB
Processor: Intel Core i7-4800MQ CPU 2.70GHzx8

ESB Kafka Connector

WSO2 ESB Kafka connector allows you to send the data to Kafka message broker.  


ThreadsMessages per a ThreadNo of MessagesA Message Size(byte)Throughput (/s)
101001,000106831
105005,0001061590
2050010,0001062251
10025025,0001062940
1,00015001,500,0001062780

Average Throughput(/s) - 2767


You can get highest throughput with default ESB configuration.


ESB Kafka Inbound Endpoint


WSO2 ESB Kafka Inbound endpoint allows you to consume the data from Kafka message broker. 


https://docs.wso2.com/display/ESB490/Working+with+Inbound+Endpoints


Above document includes inbound endpoint common parameters and how to change them for best performance. Even though I provide some recommended values with the performance tuning stats.

You can tune the Kafka inbound endpoint performance by changing the inbound thread pool values. The values can be changed in the location.


<ESB_HOME>/repository/conf/synapse.properties file


On  Sequential Mode


The following performance stat is measured with default inbound thread pool values and sequential mode.


ThreadsMessages per a ThreadNo of MessagesA Message Size(byte)Throughput (/s)
101001,00010616
105005,00010616
2050010,00010615

Average Throughput(/s) - 15

On Non Sequential Mode


The following performance stat is measured with default inbound thread pool values and non sequential mode.


inbound.threads.core = 20

inbound.threads.max = 100  

ThreadsMessages per a ThreadNo of MessagesA Message Size(byte)Throughput (/s)
101001,000106150
105005,000106151
2050010,000106126
10025025,000106136

We have gone through the performance test with default inbound thread pool.

Average Throughput(/s) - 135

Now we have increased the thread pool values and gone through the performance test.


inbound.threads.core = 200

inbound.threads.max = 1000

ThreadsMessages per a ThreadNo of MessagesA Message Size(byte)Throughput (/s)
10010010,000106769
100010001,000,000106800

We can get the throughput around 800 with above thread pool values. 
Average Throughput(/s) - 799

Now we have increased the inbound thread pool values further. The performance is measured with below inbound thread pool values and non sequential mode. The throughput is 711. There is no significant improvement compared with previous throughput.


inbound.threads.core = 500

inbound.threads.max = 2000

ThreadsMessages per a ThreadNo of MessagesA Message Size(byte)Throughput (/s)
10010010,000106757
1,00010001,000,000106710

Average Throughput(/s) - 711


You can configure the inbound common parameters according to this performance stats and see massive performance improvements with the inbound thread pool. To get highest performance, I recommend you to use the following inbound thread pool values with non sequential mode.


inbound.threads.core = 200

inbound.threads.max = 1000

Tuesday, September 22, 2015

WSO2 IS authenticator - LinkedIn

1) Create a new LinkedIn app

2) The app will be assigned an Client ID and Client Secret. In the panel, make sure to set Authorized Redirect URLs to https://localhost:9443/commonauth

Screenshot from 2015-09-08 23:04:59.png

3) Build the sso sample from product-is/modules/samples/sso/sso-agent-sample to get the travelocity war file, add the war file to a web server (apache tomcat) and start the web server.

4) Download the IS ditribution and the service pack from http://wso2.com/products/identity-server/ and apply the service pack to the IS pack.


5) Clone the linkedin authentication connector source from https://github.com/katheesR/is-connectors/tree/master/linkedin, build the linkedin connector and copy the jar to the IS_HOME/components/dropins

6) Create a Identity provider from IS management console.

Screenshot from 2015-09-08 20:34:55.png

Now you can see the linkedIn configuration under Federated authentications section. Enable and fill the value for client ID, client secret and callback URL which can be got from the step1.

Screenshot from 2015-09-08 23:53:03.png
7) Create a service provider from IS management console.

Screenshot from 2015-09-08 23:59:35.png


Screenshot from 2015-09-08 20:31:02.png


8) Extract the certificate from browser by navigating to https://www.linkedin.com/ and place the certificate file in following locations.

IS_HOME/repository/resources/security

Navigate to the above location from command prompt and execute
'keytool -importcert -file CERT_FILE_NAME -keystore client-truststore.jks -alias "LinkedIn"' in command line to import linkedin certificate into keystore. Give "wso2carbon" as password.

import the following two certificates.

keytool -importcert -file www.linkedin.com -keystore client-truststore.jks -alias "linkedin"
keytool -importcert -file DigiCertSHA2SecureServerCA -keystore client-truststore.jks -alias "Dig"


9) go to the travelocity app http://localhost:8081/travelocity.com/index.jsp and click SAML2 redirect login
Screenshot from 2015-09-09 00:05:35.png


9) The page will be redirected to the linkedin authentication page.

Screenshot from 2015-09-09 11:17:28.png

If the credential is success then you will get the  linkedin account details.

Screenshot from 2015-09-09 00:11:13.png


sample LinkedIn authentication connector code - https://github.com/katheesR/is-connectors/tree/master/linkedin

Sunday, September 20, 2015

Apache Kafka Qiuckstart

Introduction

Kafka is a distributed, partitioned, replicated commit log service. It provides the functionality of a messaging system. Kafka maintains feeds of messages in topics. Producers write data to topics and consumers read from the topics. One of the use case of Kafka is messaging system. Kafka offers queuing and publish-subscribe model.

Kafka command line tool

  • Download Apache Kafka distribution form here 
   
  • Extract and goto Kafka home  
    
  • Start the Zookeeper   
         bin/zookeeper-server-start.sh config/zookeeper.properties       

  • Start the Kafka server   
          bin/kafka-server-start.sh config/server.properties

  • Create a topic,
bin/kafka-topics.sh --create --zookeeper localhost:2181 --replication-factor 1 --partitions 1 --topic test

  • Run a producer and type the message.
bin/kafka-console-producer.sh --broker-list localhost:9092 
-- topic test 
         This is a message
         This is another message 

  • Run the consumer,the messages appear in the consumer
bin/kafka-console-consumer.sh --zookeeper localhost:2181 --topic test  --from-beginning
This is a message
This is another message


Kafka Multi Broker Cluster Setup

We will create 3 Kafka brokers (broker0, broker1 and broker2) whose configurations are based on the default.

First we make a configuration file for each of the brokers:

The default broker0 server properties file is.

config/server-1.properties:
    broker.id=0
    port=9092
    log.dir=/tmp/kafka-logs-0

copy the server.properties file for the broker1 and broker2.

> cp config/server.properties config/server-1.properties
> cp config/server.properties config/server-2.properties


Edit these new files and set the following properties:

config/server-1.properties:
    broker.id=1
    port=9093
    log.dir=/tmp/kafka-logs-1

config/server-2.properties:
    broker.id=2
    port=9094
    log.dir=/tmp/kafka-logs-2

Now we have created 3 Kafka  broker cluster. Start the Kafka server with the  appropriate server properties file.

Broker0
> bin/kafka-server-start.sh config/server.properties

Broker1
> bin/kafka-server-start.sh config/server1.properties

Broker2
> bin/kafka-server-start.sh config/server2.properties

Create a REST API with Spring Boot

In this post, I will explain how to create a simple a REST API with Spring Boot Spring Boot Spring Boot is a framework that provides inbuil...